> ## Documentation Index
> Fetch the complete documentation index at: https://diogo-home-lab.mintlify.site/llms.txt
> Use this file to discover all available pages before exploring further.
# Setup Raspberry Pis
> Get every Pi ready to be used
## 1. Intro
Before starting, I would like to give a special thanks to NetworkChuck for the excellent [video](https://www.youtube.com/watch?v=X9fSMGkjtug\&list=LL\&index=42\&t=0s) on how to set up a Raspberry Pi cluster.
This documentation page closely follows that video's instructions, with some changes to reflect some of the updates that have been made to the [Raspberry Pi Imager](https://www.raspberrypi.com/software/).
**Make sure to follow the steps in this guide for all your Raspberry Pis.**
## 2. Pre-requisites
There is a single prerequisite for this guide:
* Download and install [Raspberry Pi Imager](https://www.raspberrypi.com/software/)
This guide shows how to setup a **Raspberry Pi 5** using Raspeberry Pi imager **v1.8.5**
## 3. Install OS
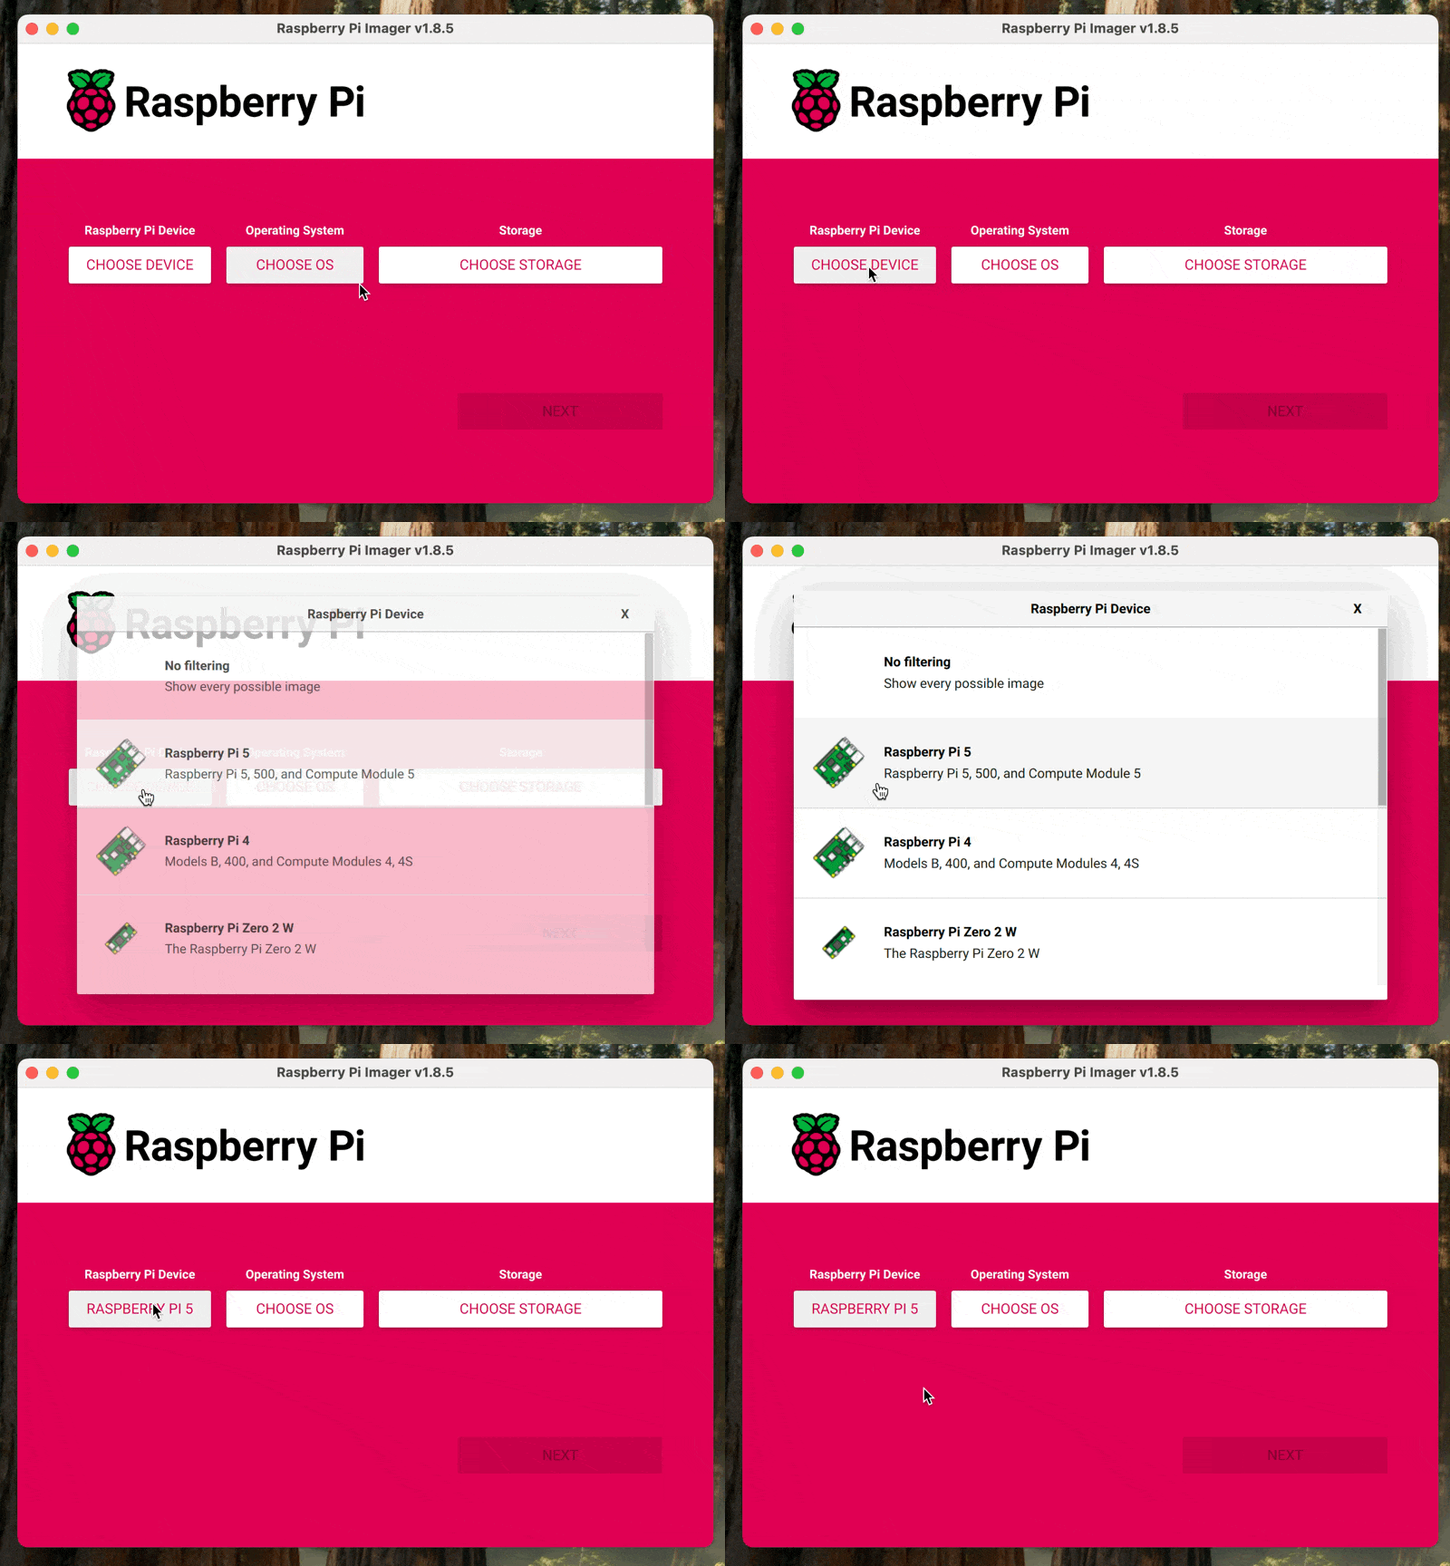
First, select your device. In this case, we are using a Raspberry Pi 5.
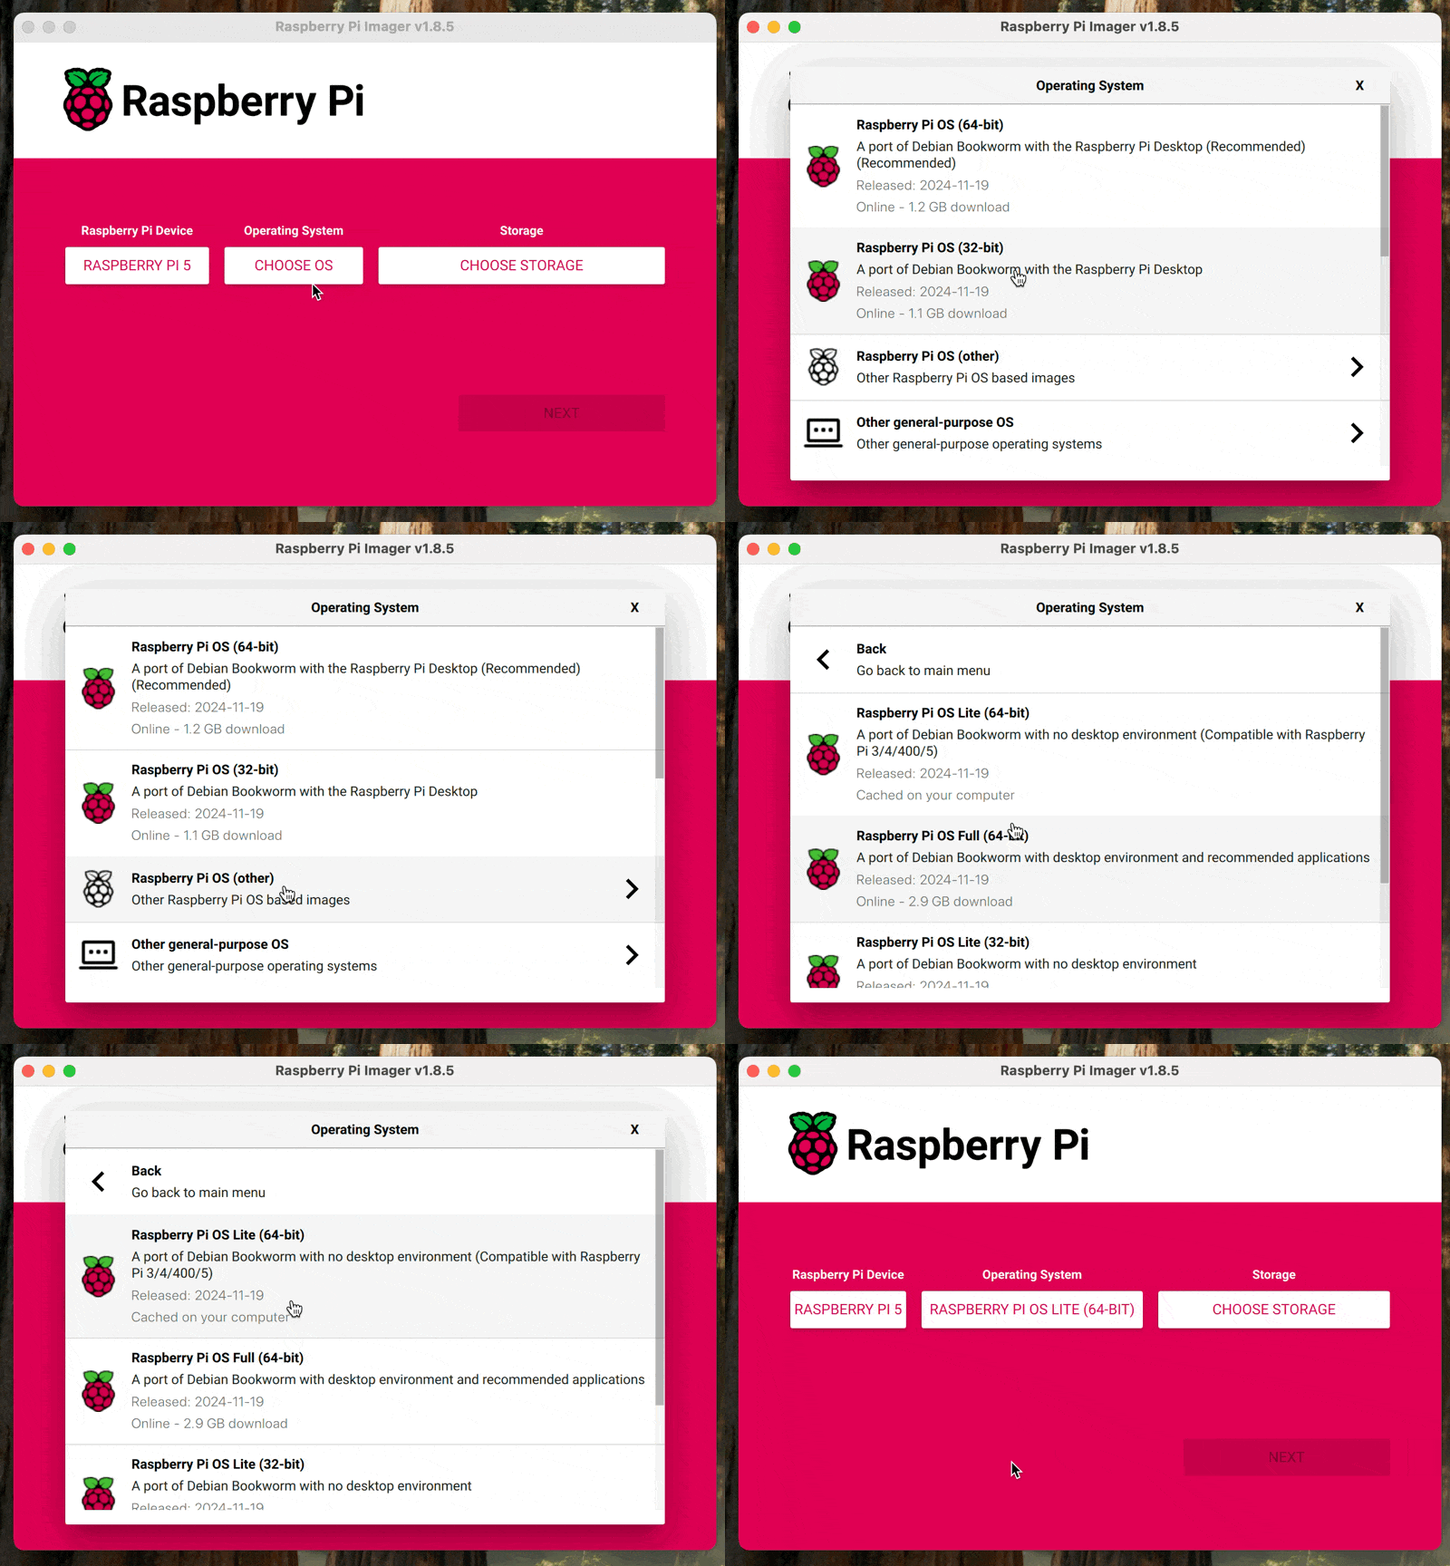
 Select **Raspberry Pi OS Lite 64-bit** as your headless OS.
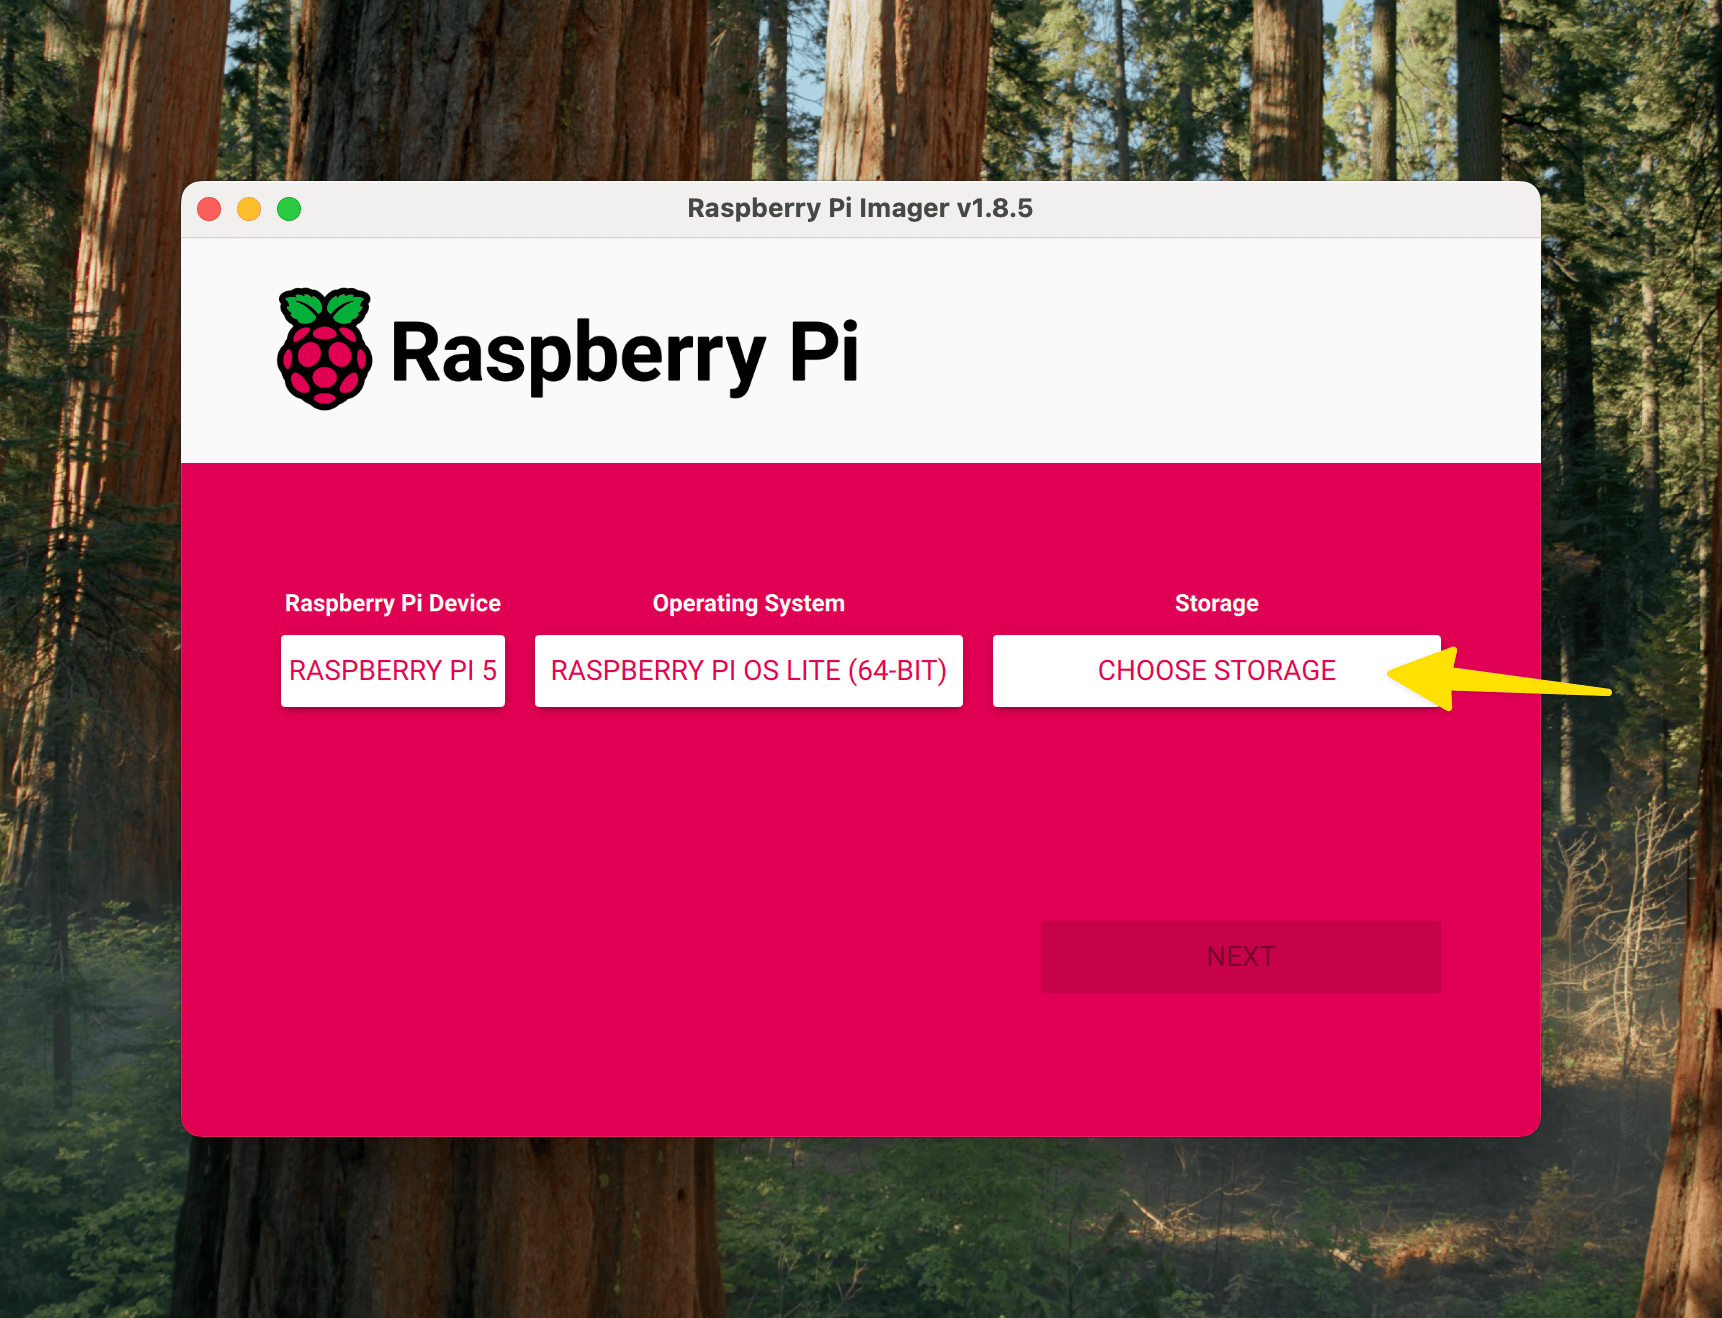
 Select the storage device where you want to install the operating system.
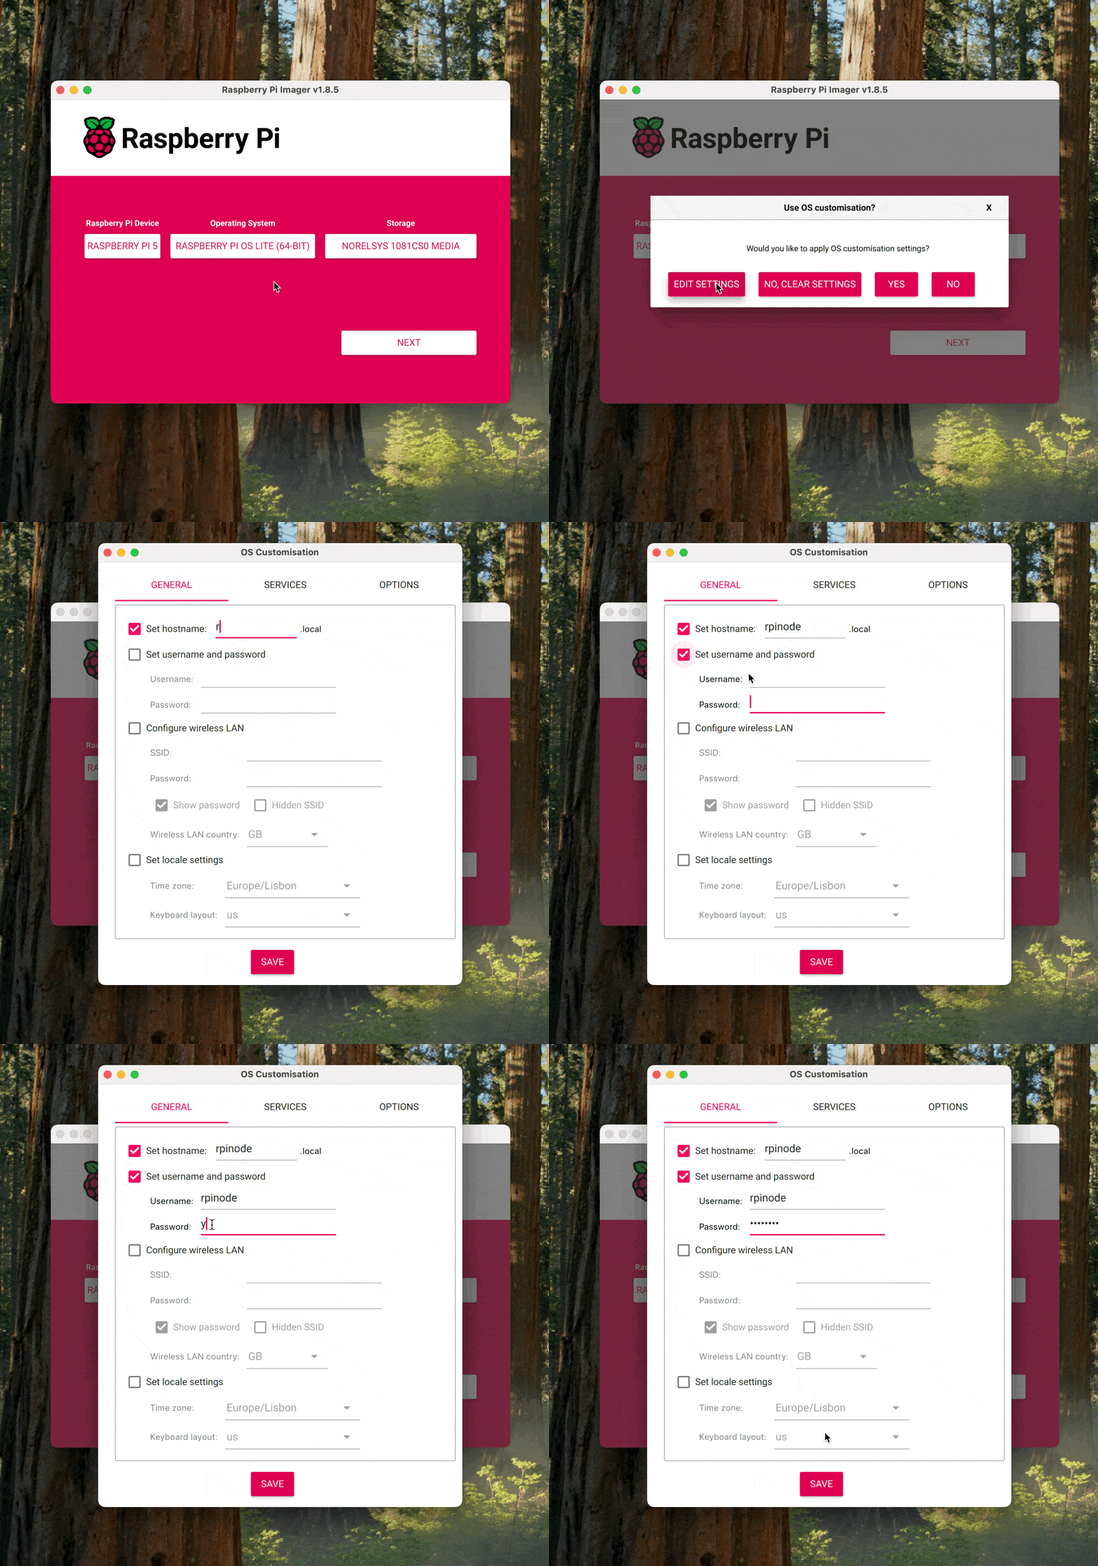
 Under the **General** tab, set your hostname, username and password.
The password you set here will be used when connecting to your node via SSH.
**Tip:** Use the same name for Username and Hostname for consistency.
Under the **General** tab, set your hostname, username and password.
The password you set here will be used when connecting to your node via SSH.
**Tip:** Use the same name for Username and Hostname for consistency.
 Enable SSH under the **Services** tab.
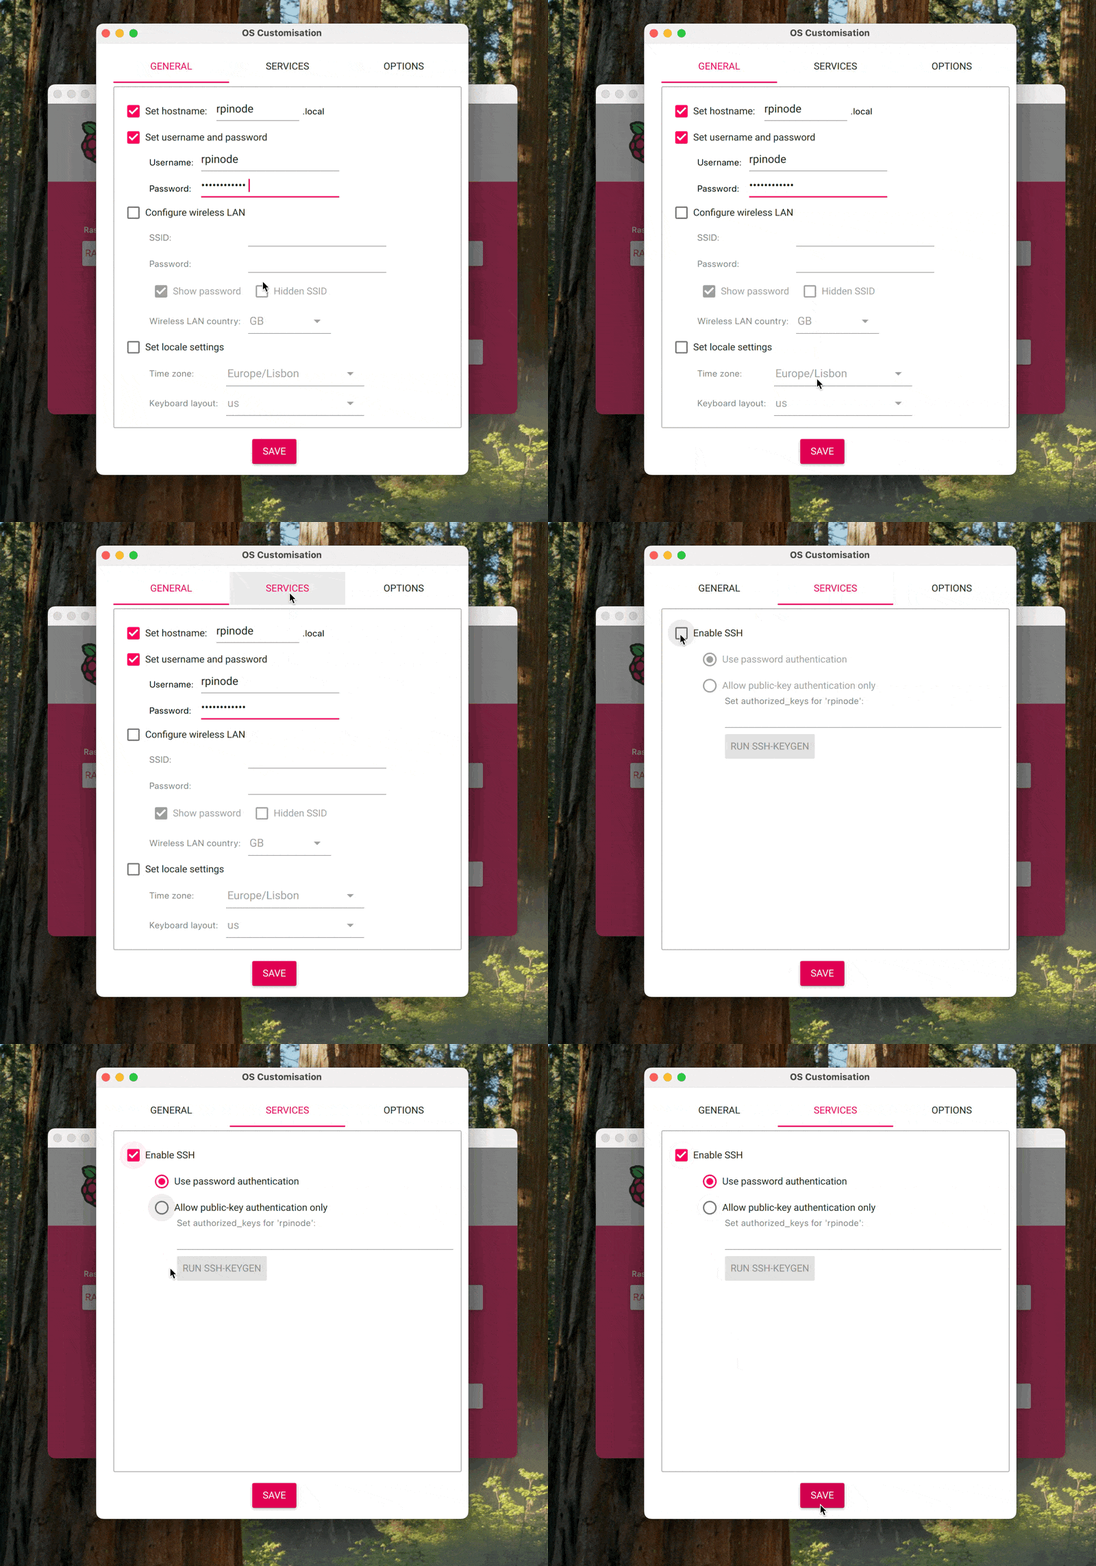 Save the changes, and let the Imager set everything up.
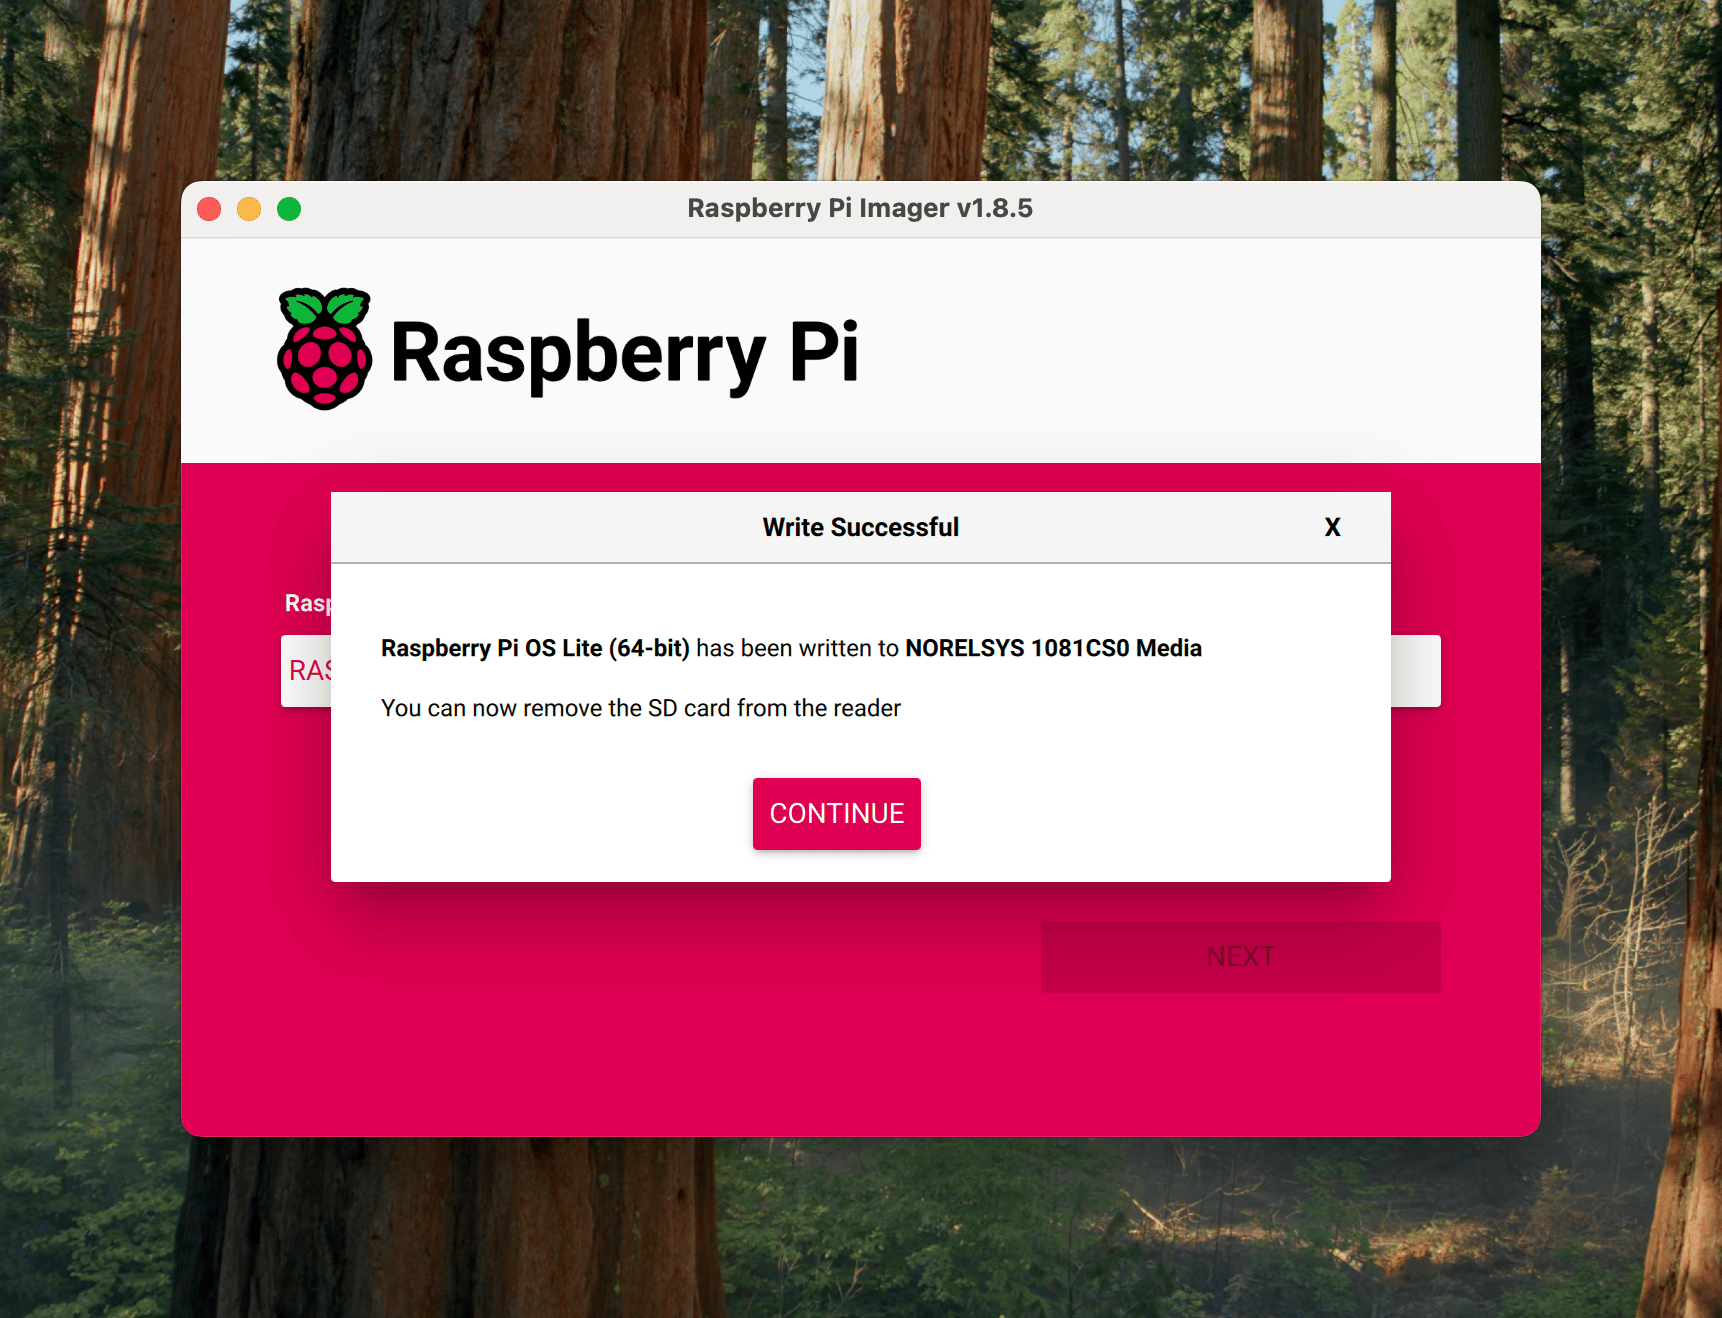 Take the storage with the OS installed on it and connect to the Pi, power it up and allow it approximately 5 minutes to complete the boot process.
## 3. Enable Cgroups
As mentioned in the [K3s docs](https://docs.k3s.io/installation/requirements?_highlight=cgroup_memory%3D1&_highlight=cgroup_enable%3Dmemory\&os=pi#cgroups), standard Raspberry Pi OS installations do not start with `cgroups` enabled. **K3S** requires `cgroups` to start the systemd service.
The following steps will guide you through enabling cgroups on your Pi.
After letting your Pi boot for the first time, turn it off and reconnect the OS storage to your computer.
Open your OS storage device, navigate to and open the file named `cmdline.txt`.
Add the following code to the end of the file:
```
cgroup_memory=1 cgroup_enable=memory
```
You should end up with something like this:
Take the storage with the OS installed on it and connect to the Pi, power it up and allow it approximately 5 minutes to complete the boot process.
## 3. Enable Cgroups
As mentioned in the [K3s docs](https://docs.k3s.io/installation/requirements?_highlight=cgroup_memory%3D1&_highlight=cgroup_enable%3Dmemory\&os=pi#cgroups), standard Raspberry Pi OS installations do not start with `cgroups` enabled. **K3S** requires `cgroups` to start the systemd service.
The following steps will guide you through enabling cgroups on your Pi.
After letting your Pi boot for the first time, turn it off and reconnect the OS storage to your computer.
Open your OS storage device, navigate to and open the file named `cmdline.txt`.
Add the following code to the end of the file:
```
cgroup_memory=1 cgroup_enable=memory
```
You should end up with something like this:
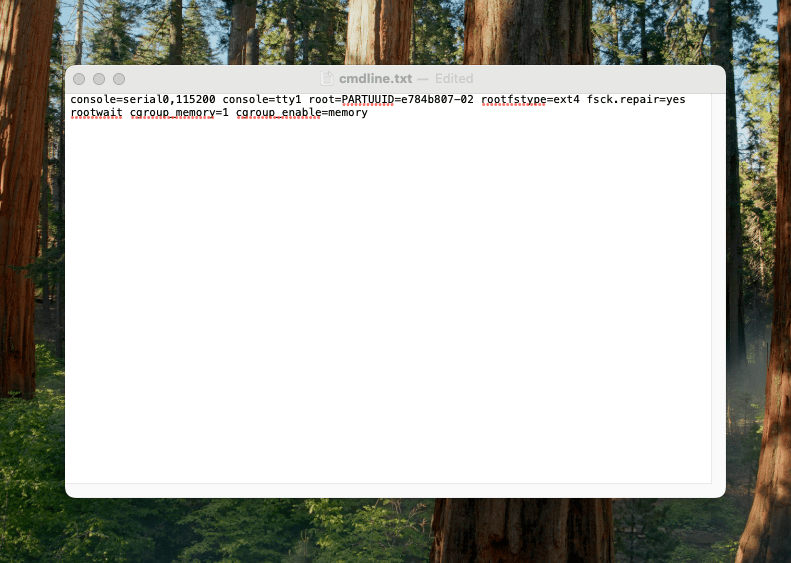 After that do not forget to save.
After editing `cmdline.txt`, remove the storage device, connect it to the Pi, and power it up to reboot.
## 4. Setting a static IP
Now all that is left is to set a static IP to whatever we would like to have.
Open the terminal and connect to your Pi using:
```bash theme={null}
ssh @
```
To set a static IP, we define:
* `ipv4.addresses` – The IP of this machine.
* `ipv4.gateway` – The router or default gateway.
* `ipv4.dns` – The DNS server to use (probably same as router).
* `ipv4.dns` – Leave it manual.
Define these values and use them for the following command:
```bash theme={null}
nmcli connection modify "Wired connection 1" \
ipv4.addresses /24 \
ipv4.gateway \
ipv4.dns \
ipv4.method manual
```
For these changes to take effect we need to reboot our Pi.
```bash theme={null}
reboot
```
**You are done setting up your Raspberry Pis!**
After that do not forget to save.
After editing `cmdline.txt`, remove the storage device, connect it to the Pi, and power it up to reboot.
## 4. Setting a static IP
Now all that is left is to set a static IP to whatever we would like to have.
Open the terminal and connect to your Pi using:
```bash theme={null}
ssh @
```
To set a static IP, we define:
* `ipv4.addresses` – The IP of this machine.
* `ipv4.gateway` – The router or default gateway.
* `ipv4.dns` – The DNS server to use (probably same as router).
* `ipv4.dns` – Leave it manual.
Define these values and use them for the following command:
```bash theme={null}
nmcli connection modify "Wired connection 1" \
ipv4.addresses /24 \
ipv4.gateway \
ipv4.dns \
ipv4.method manual
```
For these changes to take effect we need to reboot our Pi.
```bash theme={null}
reboot
```
**You are done setting up your Raspberry Pis!**